Engine Mounting.
There are a few ways of mounting the engine to the chassis. The main function of the cradle/mounting is to prevent the engine from Rocking (if it was loosely secured). To prevent the chain from loosing it's tension due to engine movement, and to prevent the engine from coming clean off the kart on a rough road. Therefore all welding as on the rest of the kart must be up to scratch. All bolts again as with the rest of the kart must be High Tensile (8.8). My hope is to be able to take the engine off the kart and to easily bolt it back on the kart at any stage, only requiring the removal of 4 bolts, cables and chain. And for the future provide a universal mounting/ Base plate for any better engines one may come across, and all they'll need to be mounted to the engine is a personal Cradle.
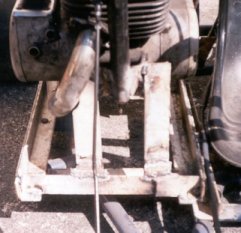
The way I have mounted my engine (a motorbike engine) to my chassis (as you might be able to see in the link to "pictures of my kart" on my main home page) is quite simple. If you are planning of having any other sort of engine skip on down the page to "GENERAL PURPOSE ENGINES" It's construction is totally out of light 1.5" (75mm) angle iron. The Base plate is constructed out of this angle iron as well as the engine Cradle. The main reason I used angle iron is because, firstly it's fairly strong, secondly I had a load of the stuff from an old roof rack of a van, and thirdly the engine can slide along this channel to adjust the chain etc, preventing sideways movement of the engine, thus upsetting the chain alignment, and only requiring fixing bolts.
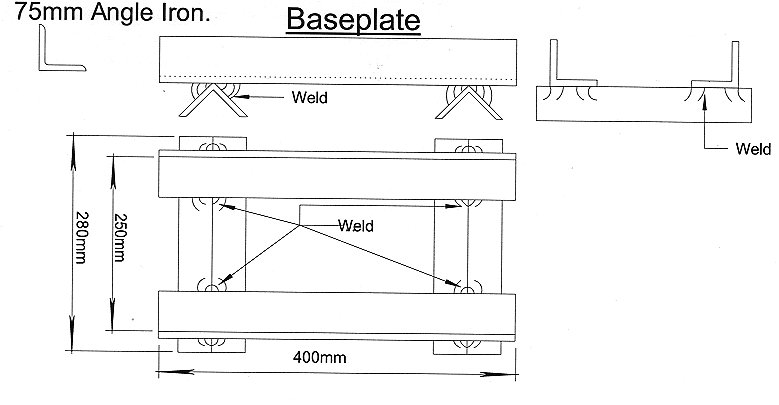
Base plate
This first diagram is for the "Base plate". This is the item which will be welded to the chassis, in the general location of where the engine will be fixed. it is made up out of four lengths of angle iron, in a rectangular shape as shown.
Do not weld this to the chassis yet, until the engine is in it's cradle. Sizes may vary depending on size of engine, bulky etc. This is for a typical 100cc engine. The Method and Construction remains the very same.
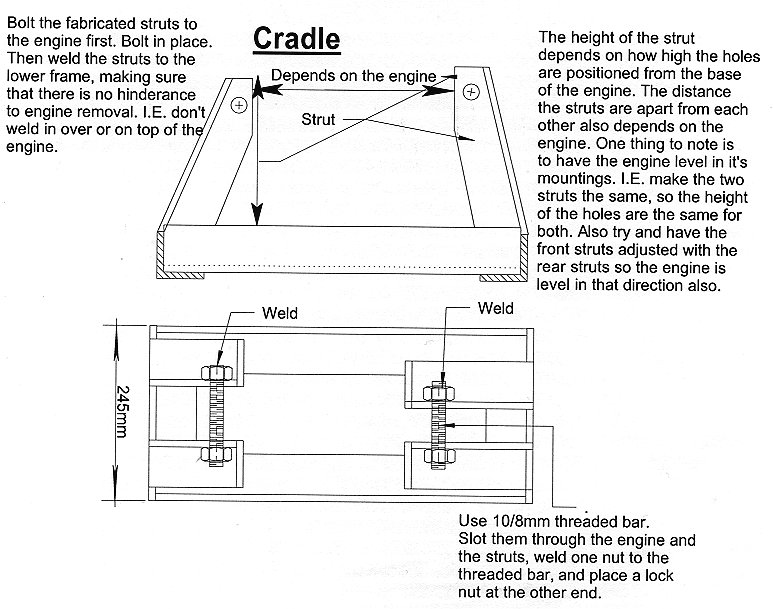
Cradle
This next diagram shows the apparatus which will be bolted to the engine, which in turn will be bolted to the Base plate. The hope is to be able to unbolt the engine totally from the kart with nothing extra bolted to it, and even to refit it back in a motorbike!. This is in case any overhauling, opening up of the engine is required.
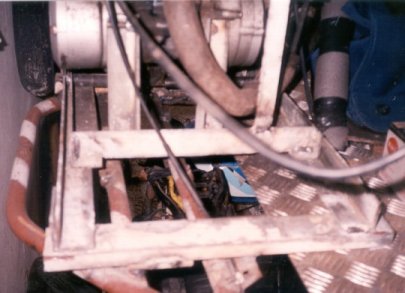
There is no exact measurements that can be quoted, the only measurement been the width of the Cradle to make sure it will fit the Base plate. All the runners, struts etc. are all firstly bolted to the engine and then welded to the Cradle. Making life a bit easier. There is a photo of how my engine is secured to it's cradle as a starting point. Depending on the size of the engine you may want three or even four supports. For anything below 125's I'd say it's all right with two, the front and the back supports. Again use 8mm (or 10mm if it will fit) threaded bar (high tensile) to bolt the engine to the struts, as in the diagram below.
Again I'd say to fashion it out of 75mm mild steel angle iron. Again to fit the Base plate nicely.
Bolting them together.
When the two items (base plate and cradle) are finished, and the engine in the cradle, put them together sitting on the chassis. Find the correct location for the chain alignment etc. then weld the Base plate to the chassis. Now fit the engine + cradle onto the base plate. Obtain the correct length of chain required. Fit the chain. Mark and drill four 8mm holes going right through both the base plate and the cradle. Remove the engine and make the hole into an 8mm slot either by using a cutting torch or by drilling a load of holes close together. this is to give a certain amount of chain adjustment. Re fit the engine, tighten up the tensioning bolt until the chain is at the correct tension, slot through the 8mm bolts and tighten everything up. And there you have it!.
Any Further Questions just E-mail me. <steviewdr@hotmail.com>
GENERAL PURPOSE ENGINES
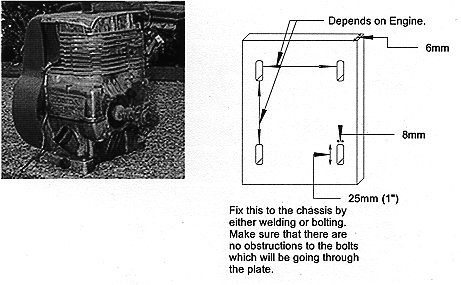
Normal generator, lawnmower, chainsaw etc. engines can be mounted more easily. Just requiring a Base plate as all these engines will have 4 mounting holes conveniently placed on their underside. Follow this easy diagram. All that has to be done is for the base plate to be welded to the chassis with four 8mm slots in the correct positions. It's as easy as that. There's no need to make things more complicated than they have to be. See Diagram below. You can clearly see from the photo below the fixing holes with can be used to mount the engine with ease. For similar idea of the channel see the bottom diagram for engine mounting of a plain engine.
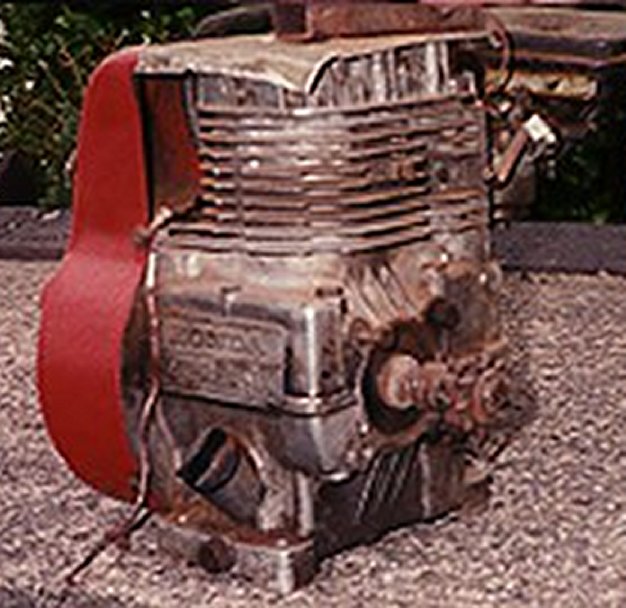
And here's how to do it for a typical engine like the one in the above photo.