The Rest of the Steering for the Kart
In this section, all the steering components such as: steering wheel, track rod linkage, drop arm and bushings used for allowing the entire system to operate smoothly.
The first thing to be done is the track rods.
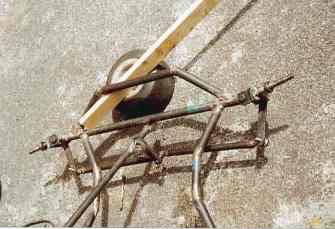
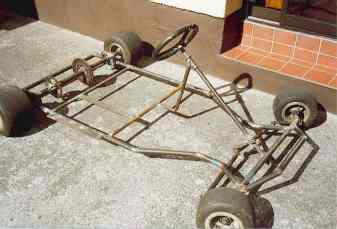
Up to this section, there have been details on the making out of the stub axles and the steering arms. Basically what the track rods do is to join the two steering arms on either side of the kart as seen in the picture below.
I would have loved to simply have one straight connecting rod to operate the two front wheels, however this is not really practable in theory and neither in practice as I found out through experimentation. Two track rods must be used.
I used proper "Rose Ends" on all the ends of each of the track rods, only because I had them off the kart that I scrapped. These "rose ends" cost money so I would have gone with ordinary 5mm high tensile bolts to connect the track rods to the stub axle. It is less hassle of course to use the "rose ends" and to weld a corresponding nut on each end of the hollow track rods (20mm O.D.) allowing for adjustment afterwards to accommodate linkage to the drop arm.
You can see from the above photo how the track rods are nearly in a straight line, this line changes however with turning of the steering wheel. Above is the complete steering system.
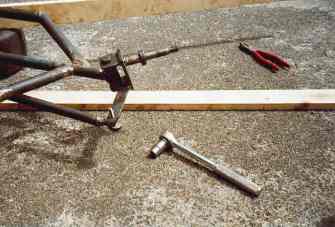
Looking at the picture below, quite simply a 8mm high tensile bolt was used to connect the rose end to the steering arm.
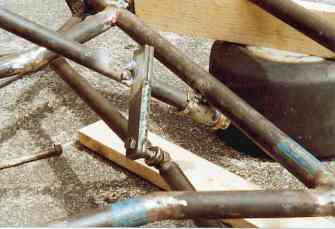
For the middle, where the two ends of the track rods meet, these quite simply are connected together and will link up to the drop arm from the steering axle via a 4" (100mm) high tensile bolt. See below.
We will talk a bit about the actual steering wheel and steering axle.
What I done in the making of this kart was to put the seat temporarily on the chassis, to sit in, stretch out my feet and estimate the angle and length of steering axle needed. In saying steering axle I mean the length of pipe to which the steering wheel is attached at the top and the other end is secured by means of a bushing to the chassis, (as seen in photo above).
This steering axle will have to be secured to the chassis by means of two securing points. One close to the top where the steering wheel and the other close to the end. Bushings, simply pipes in which the steering axle can rotate freely in.
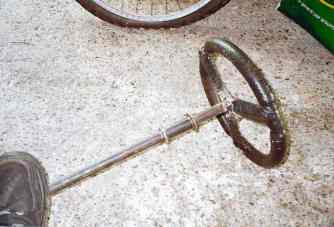
With the total length of the steering axle estimated and cut a bushing can be made for securing the top part of this axle as seen in the photo below. All one needs is any piece of pipe that will spin freely over the steering axle and to which can be welded. It has to be something fairly strong to resist some "miss-abuse". Suitable washers are needed and to be put either side of the bushing/ pipe and held on either side of the bushing by means of a split pin.
To this pipe a member can be welded coming from the chassis to secure the set-up. The complete set-up can be seen in the photo below:
The steering axle is secured at the lower end by the very same means. My recommendation is to secure the steering axle to the chassis first and then to worry about the drop arm etc. later. Place the lower bushing as low as can be allowed for. Again this can be clearly seen in this next photo.
Even looking from the photo above all that is left to be done is to place a piece of metal anywhere up this steering axle so that it meets the two middle rose ends. I welded two pieces of standard flat bar together to give a thickness of 10 mm so that the connecting bolt would have some side ways support. A good indication for the length of this drop arm is 150mm (6") to give nice turning leverage. Of course if you prefer easier/ lighter steering then this value is decreased and visa versa for quicker steering responses.
Just a common sense note to grease all these bushings before final assembly, or as I done: to grease them on first assembly and try and not to have to dissemble it again! Also make sure and use "lock nuts" EVERYWHERE and not alone on the steering. Locktite can also be used for more safety.
That should be the steering of the kart sorted now, but just a word of advice, "I didn't get it right the first time" so be patient and break the weld and try and weld the drop arm etc in a better position. Feel free to e-mail me if you have any questions/ queries.