|
|
Racing Kart Plans
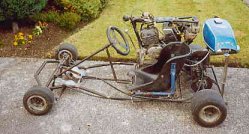
Here are plans for a racing type kart, the exact same I made, step by step over the summer. Just below is a photo of the kart I made. In this section there are step by step photographs shown the necessary measurements and details in order to make this kart. Best of Luck (although not needed to make this kart) those going to make one.
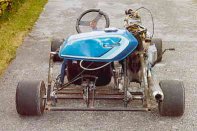
More Photos of the Finished Kart
Note on these Photograph Plans
Plans are in "photograph" form, I plan to compile them into AutoCAD form over the next while, but for the short term the photo's give a very good step by step construction with measurements.
If there are any queries about measurements etc. e-mail me and I can take exact measurements from the actual kart built.
If you look at the photo below, you will see an original racing kart with wide tyres. However when I gave it a motorbike engine transplant the kart, although been much faster in a straight line, cornering was impossible, even with fully lock the kart traveled in a straight line. My AIM was then to make a new chassis from scratch using the original wheels, bearings and brakes and photographing my progress over the weeks making this new and improved racing kart thus giving other people exact measurements and plans to build similar plans.
Click here for information on the Donor Kart.
On building this new kart I looked up a few books on karting to get more info on the steering geometry. For this kart my motto was "MILLIMETRIC PRECISION". And why not?, all it takes is a bit of patience and commitment to achieve. I knew also that if I stuck to this that there would be no reason why the kart wouldn't handle properly.
However the first couple of questions one has before building a kart are usually to do with parts, materials, bearings, wheels, engine, tubing etc. A Donor Kart is a very good idea, a crashed/ rusted kart will do. Basically the main parts essential to have before one can build a kart are as following: (MUST HAVE'S)
Four Wheels, Sufficient Bearings (for rear and front stub axles) and an Engine.
All the rest of the components such as brakes and bushings are secondary and can be got/ made up as one is building the kart.
As you can see from the Donor section, I used the wheels, bearings, front stub axles, brakes, steering wheels, motorbike engine, petrol tank and the proper racing kart seat. Such things as pedals I made up from an original design using standard tubing.
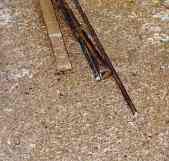
Materials I Had to Obtain Before Making the Kart:
a: (2) x 5 meter lengths of 20mm O.D. (outside diameter) piping with a wall thickness of 3mm
b: (1) x 5 meter length of 25mm O.D. " " piping with a wall thickness of 3mm
c: (1) x 6 meter length of 25mm x 5mm flat bar (mild steel)
d: (1) x 6 meter length of 8mm solid steel bar (mild steel) (very little used)
e: (10) approx x 2" (50mm) x 8mm long High Tensile Steel bolts
Above covered the bulk of the materials I needed/ used on the kart. All lengths and thicknesses were of standard sizes obtained from my local builders providers. I opted to save a couple of pounds by only purchasing 1 length of 25mm O.D. tubing and instead using cheaper 20mm O.D. tubing for cross bracing on the chassis. (cross bracing is lengths of steel piping joining both side piping/ rails of the kart running from side to side at certain intervals)
I also opted to make the pedals from 20mm O.D. (outside diameter) tubing and the 25mm x 5mm flat steel came in useful for engine mounting etc.
The simplest way to go from here is to divide the photos and plans up into the various sections of building the kart:
Making the Chassis : front bumper
The King Pins : stub axles and yokes, caster and camber angles
Mounting the Rear Axle : 90 degrees to the chassis
Steering Arms : Ackerman angle
Steering System : steering wheel, track rods etc.